Saturday, April 8, 2017

Herby Baked Salmon

Would you like your kids to enjoy eating salmon?

Well give this recipe a go, it got the thumbs up from my tough little critics.
I served them up quite big portions, thinking I'd get some scraps, but everything was polished off.
Hopefully all the healthy omega 3 fats will result in great behaviour!


Herby Baked Salmon


Ingredients

400 - 500g fresh salmon
1 Tablespoon fresh basil, roughly chopped
1 Tablespoon fresh oregano, roughly chopped
1 Tablespoon fresh rosemary
1 Tablespoon dried onion flakes
1 teaspoon dried garlic granules
2 sun dried tomatoes, roughly chopped
1 Tablespoon quinoa flakes
1 Tablespoon buckwheat flakes
1 Tablespoon parmesen cheese
1/2 teaspoon salt and pepper
1 Tablespoons flax seeds
2 Tablespoons olive oil


Directions

1. Preheat your oven to 180 degrees

2. Combine all the ingredients in a blender, except the salmon and olive oil. Blend until there are no big lumps.

3. Place your salmon in an oven proof dish. Sprinkle the herb mixture on top of the salmon, drizzle with olive oil and bake for 10 minutes.


 This is my fussy Miss 5, enjoying her salmon.

And the non fussy nine year old eating his.
And the blink and it's gone 2 year old.


Friday, January 6, 2017

Sourdough steamed buns

My fussy little 5 year old likes a lot of variety, and she's been getting bored at lunch time.
So we thought we would give steamed buns a try, and so far, so good.


Sourdough Steamed buns


For the Dough


Ingredients

1 1/2 cups whole spelt flour
1 1/2 cups white spelt flour
2 Tablespoons melted coconut oil
1/2 cup sourdough starter
1/2 cup water
1/2 teaspoon baking soda

Directions

Combine all ingredients except the baking soda. Mix well, you may need to add a few drops of water if too dry.
Knead for a few minutes.

Cover and leave for several hours or longer to sour.

When your ready to make the buns, knead through the baking soda.
Split the dough into 8 small balls.

Filling


You can use whatever you want. This mixture was just what was in our garden and fridge at the time, but the possibilities are endless.

Ingredients

1 Tablespoon coconut oil
1/2 onion, finely diced
1 carrot, grated
1 cup cabbage, red and green finely diced
1/2 cup finely chopped spinach
1 clove garlic, finely grated
1/2 teaspoon 5 spice
1 Tablespoon soy sauce


Directions

Heat a small fry pan and add the coconut oil.
Add the onion, and fry gently for a few minutes.
Add the rest of the ingredients and cook for a few minutes, stirring often.

Lets put it together

Grab your dough, roll each little ball, and flatten slightly.
Roll out on a gently dusted surface (or baking paper) to make a 10cm circle.


 Add 1 heaped tablespoon of filling to the middle, then take an edge of dough and fold over the filling mixture.
Select the next edge of dough a few centimeters along, and make a fold, continue all the way round your dumpling.
Twist the top to seal it.
Place your completed buns in a steamer lined with baking paper.


 And steam for 15 minutes.


And enjoy! My little monkeys did.

Monday, June 6, 2016

It's a wrap

We are loving sourdough wraps for lunch at the moment.

They are tasty, and soft, and you can fit so much more healthy salad ingredients into them than a sandwich.

They are best cooked and then eaten straight away.

Sourdough Wraps

makes 6 large wraps


Ingredients

2/3 cup whole flour
1 1/3 cups white flour
3 Tablespoons melted coconut oil
1/2 cup sourdough starter


Directions

Combine all the ingredients in a bowl. Mix well, you may need to add 1 -2 Tablespoons of water to form a nice ball of dough, then knead for a few minutes.
Cover with plastic wrap and leave overnight or longer to sour.

When your ready to cook them, cut the dough into 6, and roll into balls.
Flatten the balls, and roll out on a gently dusted surface to make a large circle (approx 25-30cm diameter).
I like to roll mine out on baking paper.
Heat up a heavy fry pan with no oil, or I like to use my electric pizza oven with a ceramic stone base.
Either flip your rolled out wrap onto your pan (I always find that bit tricky), or lift your wrap on the baking paper and put them onto the hot pan (baking paper down).
I find this the easiest for me.
Cook for 30 seconds, then flip and cook the other side. If you are using baking paper you can remove it now, but save it for holding your wraps together when they are full.


Fill with your favourite ingredients, roll up and


enjoy!


Thursday, March 17, 2016

Sourdough Berry Delight


Sourdough Berry Delight

serves 4 - 5

What can you have for breakfast when you feel like something sweet, but not as labour intensive, and healthier than  pancakes.

Give Berry Delight a try.


Ingredients

1/3 cup buckwheat flakes or flour
1/3 cup quinoa flakes
2/3 cup white spelt flour
2/3 cup sourdough starter
1/3 cup water
3 eggs, beaten
1 teaspoon cinnamon
4 - 5 cups chopped fruit (I have used 1 apple, 1 pear, and 2 cups frozen berries in this one, but you can use whatever you have, I even bulked it up with grated sweet potato and carrot before).


Directions

Combine the buckwheat flakes or flour, quinoa flakes, spelt flour, sourdough starter, and water. 
Mix well to combine and leave for several hours, or overnight.
Ensure your batter mixture is covered to keep insects out.

When ready to cook, add all the chopped fruit to a frypan and cook gently.

Turn your grill on.

Add the eggs to the batter mixture, and mix well.
Pour the batter mixture on the top of the cooking fruit, and leave to cook gently for 5 - 6 minutes.

Transfer frying pan to under the grill, and grill until the top is starting to look golden (normally another 5 minutes).

Cut into wedges and serve.
We like a big dollop of yogurt on the top.


Monday, January 4, 2016

Cheese and onion popcorn

Cheese and Onion popcorn 


This is a really simple recipe, but irresistible. So irresistible that my family ate 3 batches of popcorn in one go.

It contains nutritional yeast for it's cheesy flavour and plentiful B vitamins,  
Kelp salt for the many minerals kelp and other seaweeds contain (and that our soils are lacking), 
And dried onion powder for that delicious onion flavour.


Ingredients

1 batch unflavoured popcorn
1 Tablespoon (or more if you like) melted butter or coconut oil

Seasoning

2 teaspoons dried onion powder
1/2 teaspoon kelp salt
2 teaspoons nutritional yeast

Directions

Combine the seasoning ingredients together in a small bowl, and mix well. 
Pour your melted butter or coconut oil on your popped popcorn, and add a teaspoon or so of your seasonings. 
Enjoy.


Monday, November 16, 2015

Sourdough fruit bread

This should really be called fruit and vege bread, it's amazing what you can sneak into a loaf of bread.
And it's really handy for when 'I'm hungry' strikes.
It's a lovely moist loaf, which keeps for several days.


Sourdough Fruit bread


Ingredients

2 cups whole spelt flour, sifted
1 cup dessicated coconut
1 cup water
3/4 cup sourdough starter
1 banana, mashed
1 carrot, grated
1/2 cup grated zuchinni 
1/2 cup raisins
1 teaspoon cinnamon
3 cups white spelt flour


Directions

1. Combine the first 4 ingredients in a non metallic bowl, and leave for 2 - 24 hours to ferment.

2. Add the rest of the ingredients, mix, then knead for a few minutes before transferring dough to either bread machine pan, or loaf tin.
Cover, and let rise for 2 - 5 hours.

3. Use the bake only setting in a bread machine, or heat your oven to 180 degrees and bake for 57 minutes,


Saturday, October 31, 2015

Low sugar cheesecake

This is a no bake, low sugar cheesecake.
So low in sugar that it doesn't actually contain any processed sugar, just 2 Tablespoons of raw honey to sweeten it, and the natural sweetness of a fresh pear.

The base does take a bit more organisation than a typical crunch up biscuits and butter base, as it is made with sprouted buckwheat groats. But don't let this put you off as it is really simple, but just takes a bit of preparation.
And the great thing about buckwheat is it's gluten free, and contains B vitamins and an essential amino acid called tryptophan.

Tryptophan is really important for your body to create serotonin, which is the feel good chemical.

So basicly what I'm trying to say is this cheesecake will make you happy.


You can just soak the buckwheat groats for half an hour before using, or sprout them for a few days for maximum nutritional benefits.


Low Sugar Cheesecake


Ingredients

Base

1 cup of soaked or sprouted hulled buckwheat groats
1 cup shredded or dessicated coconut
1 Tablespoon chia seeds
2 Tablespoons coconut oil
10 dried apricots, cur into small pieces
juice of half orange

Middle Layer

250g quark or cream cheese
200g greek yogurt
1 pear, peeled, cored, and cut into chunks
3 Tablespoons lemon juice
2 Tablespoons honey
1 teaspoon vanilla
1/3 cup water
2 Tablespoons gelatin

Top with sliced kiwifruit or sliced strawberries if you prefer.


To make this cheesecake, soak the dried apricots in the orange juice for a few minutes then combine all base ingredients in a food processor.
Blend until well combined and press into the base of a 20x20cm dish.
Place in your fridge while you make the next layer.

Combine the water and gelatin in a cup. Sit the cup in a small bowl of boiling water and stir until the gelatin has dissolved.
Add all the middle layer ingredients to your food processor, and blend well.
Pour on to the top of the base layer and leave to set (will take about an hour).

When ready to serve, top with sliced kiwifruit and serve.


Thursday, October 29, 2015

Mango frozen yogurt

This is a yummy, easy snack for sunny days.
I think we will be having a lot more of this recipe as the weather warms up.

I find it convenient to freeze milk and yogurt in ice cube trays if I don't think we will use it all before it's expiry date.
It's really handy for whipping up a quick, healthy dessert.


Mango Frozen Yogurt


Ingredients

1 cup mango, frozen into chunks
8 ice cubes frozen yogurt
8 ice cubes frozen milk
1 teaspoon vanilla
juice of 1/2 orange

Combine all ingredients in a food processor and blitz until smooth.
Serve immediately.


Yum!


Saturday, October 10, 2015

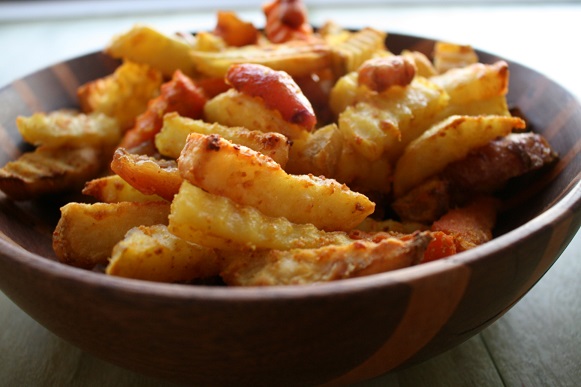
Chips!

What kid doesn't love chips?
Mine love them.

And I don't mind them having them with their meal if they eat this version.
You can also add other vegetables into the mix such as sweet potato, kohl rabi, yams, parsnip, beetroot, and make a colourful bowl of chips.

I use a crinkle cutter to make mine. If you are a Whangarei local, I got mine from Arthurs Emporium for $1.50, although I have seen them cheap on www.amazon.com also.


Oven Chips
Serves 4

Ingredients
3 large potatoes (peeled if you like) cut into chips
1 Tablespoon of coconut oil
Kelp salt

Start heating your oven to 230 degrees.
Place cut potatoes into a pot, and cover with boiling water.
Boil for 2 - 3 minutes (I use my egg timer).

Drain immediately, and tip the potatoes into a large mixing bowl. 
Dot the hot potatoes with coconut oil and leave to melt.

Once melted season with kelp salt and shake the bowl to coat the chips with the coconut oil.
Tip onto a baking tray lined with baking paper.

Put tray into hot oven, turn them after 20 minutes and cook for a further 15 minutes or until golden brown.
Serve immediately.

Experiment with different seasonings, we like garlic granules and salt. Also lemon pepper is nice. 


Thursday, September 24, 2015

Sourdough sweet potato brownie


I'm really pleased with this recipe, and so are my family.
I'm ecstatic to make a treat that's actually good for them, and it tastes great. Woo hoo!
It is low in grains, high in fruit and vege's, and no added sugar (apart from the sugar in the dark chocolate used in the icing).


Ingredients

300g sweet potato, peeled, diced and steamed.
1/2 cup buckwheat flour
1/3 cup dessicated coconut
1/3 cup spelt flour
1/3 cup sourdough starter
3 Tablespoons carob powder
1 Tablespoon cocoa powder
3 Tablespoons butter, melted
1 egg, beaten
1 banana, mashed
1/2 cup blackcurrants (mine are frozen)
1 teaspoon baking soda


Icing

50g 70% dark chocolate
3 Tablespoons cream


1. Mash the steamed sweet potato well, and let cool.

2. Add the next 8 ingredients, mix well and cover. Leave for 2 - 24 hours.

3. Heat your oven to 180 degrees.
    Line a 20x20cm cake tin with baking paper.
    Add the last 3 ingredients, and mix through the batter.
    Pour into your prepared tin and bake for 40 minutes.

4. Check that your brownie is cooked in the middle, and a sharp knife comes out clean.
    When cooked remove from pan, and let cool.

5. Melt the dark chocolate in a small bowl over hot water.
    When melted add the 3 Tablespoons of cream and mix well.
    Spoon the icing over the brownie and spread with a knife.


If you are local, I get my blackcurrants frozen from Putiputi ra in Whangarei.

Tuesday, September 22, 2015

Yogurt and Mint Coleslaw

This recipe is a favourite side dish in our household. My children often ask for more.
Luckily it makes large portions.
It's perfect at this time of year while cabbages are abundant.


Yogurt and Mint Coleslaw

Serves 4

Ingredients
2 ½ cups grated cabbage
2 carrots, peeled and roughly grated
½ yellow capsicum pepper, finely sliced
½ red capsicum pepper, finely sliced
2 Tablespoons finely diced onion
2 Tablespoons finely diced mint
2 Tablespoons apple cider vinegar
½ cup yoghurt
Salt and pepper

Combine cabbage, carrots, capsicum peppers, and onion in a large bowl.
In a small bowl combine mint, vinegar, and yoghurt. Mix well, and then pour over coleslaw mix and gently stir.

Serve and enjoy.

Friday, September 18, 2015

Sourdough mini bagels

These are kid sized mini bagels.
I used to always regret making bagels when I was mid way through making them, the extra step of boiling them before baking always felt like like a hassle when you had a big batch to do.
So this recipe only makes a small batch of 4 small bagels, which means you fit them all in a pot at once.
Just perfect for a healthy, nutritious lunch or snack for mums and bubs, and kids.

Sourdough Mini Bagels


Ingredients

1/2 cup sourdough starter
1/2 cup whole spelt flour, sifted
3/4 cup white spelt flour
2 Tablespoons avocado or olive oil

Combine all ingredients in a mixing bowl. Knead until just combined. If mixture is to dry add 1 -2 Tablespoons water.
Cover bowl and leave for 5 hours or more.

Divide into 4 equal pieces and shape dough into a ball. Flatten slightly and poke a finger through the middle to form the bagel shape.
Let rise for a few hours.

When ready heat oven to 180 degrees, and boil about 5cm water at the bottom of a large pot.
When water is boiling, turn the heat down a little and boil your bagels for a minute each side.
Remove with a slotted spoon.
Sprinkle with toppings of your choice, the picture above has grated parmesan cheese.
Bake for 15 minutes.

Once baked and cooled slightly, split and fill.
Ours had cream cheese, salmon, lettuce, and cucumber.
Yum!


Variation

For a fruit and nut bagel, add a few tablespoons of slithered almonds, 1 teaspoon cinnamon, and 2 - 3 Tablespoons raisins (I soaked mine for about 15 minutes in water before using).


Wednesday, September 9, 2015

A tasty family snack

This is a handy little mixture, to help you create a quick and healthy snack, breakfast, or lunch.
Store it in the fridge in an airtight container, and it will keep for a few days....if it lasts that long, it doesn't around here.

Egg Sandwich Mix


Ingredients

2 hard boiled eggs (boil with 1 teaspoon baking soda to make peeling easier)
1 or 2 carrots, grated
1 tomato, finely diced
1 cup grated chedder cheese
2 Tablespoons parsley, finely diced
2 Tablespoons natural, unsweetened yogurt
1 teaspoon mustard
salt and pepper to taste

Optional Extras

2 Tablespoons finely chopped onion, or spring onion
2 Tablespoons finely chopped celery
1/2 capsicum pepper, finely diced

Mash the hard boiled eggs with the back of a fork, and add to a mixing bowl with the rest of the ingredients. Mix well.

To serve either add to buttered sourdough toast (as above), or use in a sandwich, or add to your favourite cracker, or add to bread with a little extra grated cheese and place under the grill for a tasty toastie (below).


Thursday, September 3, 2015

Spinach and Feta Fritters

We have been loving these fritters for breakfast.
We love them so much that we have had mashed potatoes 3 nights in a row, just so we can use leftovers to whip them up quickly the next morning.


Ingredients

1 1/2 cups mashed potatoes
4 eggs
1 1/2 cups finely diced spinach
100g cubed feta
pepper
coconut oil for frying
Greek yogurt and parsley to season

1. Combine the mashed potatoes, eggs, feta, and pepper. Mix well.

2. Heat 1 or 2 Tablespoons of  coconut oil in the fry pan. When hot add 1 Tablespoon of the mixture to the frypan. Let the first side cook well before flipping.
If you want to keep the fritters in a round shape, then place the mixture into an egg ring on the hot frypan. Let cook for about 10 seconds before removing the ring for the next fritter.

3. Serve immediately with a spoon of yoghurt and parsley as garnish if desired.

Saturday, August 22, 2015

Have you heard of a brown rice starter?


I love brown rice, with it's nutty flavour and firm texture.
Brown rice feels more filling than white rice, and it's glycemic index is lower than white rice which means it doesn't impact our blood sugar levels quite as much as white rice.
But it does take ages to cook and it also contains a substance called phytic acid.

Phytic acid is an  anti-nutrient that blocks absorption of many important minerals such as phosphorus, calcium, magnesium, iron, and zinc.
To get the most nutrients from our food, it makes sense to reduce our phytic acid levels before consuming it.

To break down phytic acid an enzyme called phytase is needed.
Unfortunately brown rice is very low in phytase so requires a starter to reduce phytic acid levels.
Luckily a brown rice starter is very easy to make, and will reduce phytic acid levels by 96%.
It just takes a bit of preparation ahead of time, and as a bonus it shortens the cooking time.


How to make a brown rice starter

1. Combine 2 Tablespoons of brown rice with 2 Tablespoons of dechlorinated water.
Let soak for 24 hours.
Strain the rice, saving the liquid the rice was soaked in, discard the rice.

2. Add 1/4 cup brown rice, 1/3 cup dechlorinated water , and the reserved water from the previous soak. Soak for 24 hours.
Strain the rice, reserving the liquid the rice was soaked in.

3. Combine 1/2 cup brown rice, 1 cup dechlorinated water, and the reserved water from the previous soak. Leave for 24 hours.
Strain and reserve the liquid. This is your brown rice starter.
You can store this liquid in a jar in your fridge.

When you are planning to prepare some brown rice, add at least 10% of your starter to water, and soak your rice in it for 24hours.
Strain your rice once it has been soaked, rinse and then cook as usual.
This should decrease phytic acid content by 96% in your rice, and your rice will be quicker to cook.
Remember to save some of your soak water every so often to keep your starter going.


Wednesday, August 12, 2015

Baby rice isn't nice

There must have been some very impressive marketing back in the 1960's to convince mums to start feeding their babies packaged baby food, and I'm amazed that baby rice is still popular today.
Surely something that can sit on a shelf for months, and requires very little cooking can't be good for anyone.


I can see that baby rice would be very unlikely to cause an allergic reaction, as it is really just a blob of nothing. No nutrition, no flavour, no texture.  It's not surprising babies generally take some convincing to eat the stuff, you can't really blame them.

But their are more nutritious options for low allergenic first foods.
What about apple, pear, cauliflower, squash, sweet potato, carrot...the list could go on and on with fresh, seasonal, natural food that have fuelled generations of humans.
These naturally occurring whole foods are full of flavour, and texture that these little oral sensory seeking creatures are desperate for.
Let them have this opportunity for learning.
Let them play, feel it with their fingers, practice their fine motor skills, smell it, taste it, because before you know it this phase will have passed and be replaced by a much more cautious phase.


As respected pediatrician and author Alan Greene states 'Babies’ long-term food preferences and metabolisms are influenced by early food exposures. At this critical window of development, ripe with opportunity, we are giving babies a concentrated, unhealthy carb. Metabolically, it’s not that different from giving babies a spoonful of sugar'. 


I really enjoy it, as while my mess maker model 3 plays with his food, I get to sit down for a record length of time for a mum of a 6 month old and eat myself.
Although I must admit the clean up afterwards is a bit of a drag.


So what is so unhealthy about baby rice. It's rice isn't it?
Baby rice is created from white rice which is manufactured into a  highly processed starch in the form of a simple carbohydrate.
Once consumed it will convert to a sugar and cause a large spike in blood sugar levels.
Baby rice has a Glycemic Index of 95. The Glycemic index (GI) is a measurement that shows how much a food will impact our blood sugar level. Glucose has a GI of 100, apple GI is 38, banana is 52, pear is 38, carrot is 47, sweet potato 44. Very few foods have a glycemic index as high as baby rice, although Lucozade has a GI of 95 also.

This is a concern as diets with high GI foods are linked with many health problems such as diabetes, some cancers, obesity and cardiovascular disease.
It's also very bland, it does nothing to stimulate their taste buds, or prepare them for the food we want them to enjoy.
Baby food doesn't have to be bland.

But what about iron?


So many mums say they give their babies baby rice for the iron content.
Baby rice does contain plenty of artificially added, difficult to absorb, iron, Breast milk on the other hand contains small amounts of easily absorbable iron.
Breast milks iron is bound to specialized proteins that ensure only the baby can use the available iron.
The iron in baby rice doesn't have these specialized proteins and the excessive iron feeds harmful bacteria in the babies intestinal tract.
A study in 1995 found that babies who had not received iron fortified food in their first 7 months of life had significantly higher hemoglobin levels, than babies who received iron fortified solid food before 7 months of age.


If you are concerned about your babies iron levels then feed them foods naturally high in iron such as breast milk, sweet potato, squash, meat & poultry, and spinach.

In conclusion stick to whole foods as close to their natural state as possible.
Let your baby have fun and explore food and flavours, and skip the baby rice.
You won't regret it.


References


Alan Greene. Whiteout FAQ. 
http://www.drgreene.com/whiteout-faq/

Kelly Bonyata. Is Iron-Supplementation Necessary?
http://kellymom.com/nutrition/vitamins/iron/

Pisacane A, et al. Iron status in breast-fed infants. J Pediatr 1995 Sep;127(3):429-31.

Sears W. What are the best sources or iron. http://www.askdrsears.com/topics/feeding-eating/family-nutrition/iron/what-are-the-best-food-sources-of-iron.


Sunday, August 2, 2015

Sourdough battered fish

Do your kids like fish?
This recipe gives the fish and chip shop a run for it's money, and my kids love it.
Even better, it's fast and simple, and much healthier than a take away, and tastes great.

Sourdough Battered Fish


Ingredients
1 fillet of fish per person and rubbed with a small amount of white flour (this helps the batter to stick).

For the Batter  (will make enough for 6 fillets of fish)
1/2 cup white spelt flour
1/2 cup sourdough starter
1/4 cup water
1 teaspoon baking soda
1/3 cup something fizzy (either beer, kombucha, kefir, soda water)
1 Tablespoon lemon pepper (optional)
1/2 teaspoon salt
coconut oil for frying

Combine the first 3 ingredients in a bowl big enough to dip fish into. Leave until ready to cook the fish.
When ready to cook the fish, add everything else except the coconut oil, and mix well.
Heat some coconut oil in a fry pan (about 3 Tablespoons) and ensure it's hot before beginning to cook. You can drop just a spot of batter in to check. It should sizzle, bubble, and brown quite quickly.
If it isn't hot enough the batter will stick to the pan.
When hot enough, dip the fish into the batter and place into the hot oil. Let cook until browned on the first side then flip over and brown the second side.
Serve immediately and enjoy.


Tuesday, July 28, 2015

Kid Friendly Vege Curry

This is a mild, vegetable  filled curry suitable for children.

I cook it in a slow cooker, but you could also cook in a saucepan.

It contains many health promoting ingredients such as tumeric (for anti inflammatory effects), garlic and onion (for fighting infections), coconut cream with it's lauric acic provides anti viral and anti bacterial properties, and plenty of  healthy vegetables.
We use home made stock in it for it's gut healing benefits.

I hope your family enjoys it as much as mine.


Kid Friendly Vege Curry


Ingredients

2 Tablespoons butter
1 onion, finely diced
2 cloves garlic, finely grated
1 cm piece of ginger, finely grated
1/2 teaspoon tumeric
1 Tablespoon mild curry powder
200g sweet potato, peeled and cubed
200g pumpkin or butternut squash, peeled and cubed
400g can of coconut cream
3 Tablespoons tomato paste
1 cup stock
2 potatoes, peeled and cubed
2 carrots, peeled and sliced
150g (half a head) cauliflower, broken into florets
salt and pepper to season

Directions

If cooking in slow cooker, turn to high and add the first 11 ingredients.
Let cook for about 2 hours (until sweet potato and pumpkin are soft).
Either blend the mixture with a stick blender or mash with a potato masher.
Add the potatoes, carrots, and cauliflower, and cook either on high for another 2 hours or low for 4 - 5 hours.
Season with salt and pepper before serving.

If cooking in a saucepan, melt butter and gently fry onions for a few minutes.
Add garlic, ginger, tumeric, curry powder, sweet potato, pumpkin or butternut squash, coconut cream, stock, and tomato paste.
Gently simmer until sweet potato and pumpkin are soft (about 15 - 20 minutes).
Either blend the mixture with a stick blender or mash with a potato masher.
Add the potatoes, carrots, and cauliflower, and simmer for another 20 minutes or until potatoes are cooked.
Season with salt and pepper before serving.


Tuesday, July 21, 2015

Sugar free Sorbet

Persimmons or otherwise known as Sharon fruit are at the end of their season here in New Zealand, but there are still a few around and I even spotted some discounted at our local supermarket.

Grab some while you can and pop them in your freezer, they make a terrific base for this delicious sorbet.

I'm hoping to save some till summer, but I seriously doubt they will last that long.


Persimmon and Orange Sorbet


Ingredients

2 Persimmon
1 Orange

1. Peel the persimmons with a vegetable peeler, roughly chop and freeze. 
Alternatively you can freeze the persimmons whole, then peel and chop while frozen but your hands will freeze too, and you will need a sharp vegetable peeler.

2. Juice your orange and freeze the juice into an ice cube tray (it will only fill 2 - 3 cubes).

3. Combine the frozen ingredients in a food processor and blend until very smooth (this may take a few minutes).
Either serve immediately or place sorbet back in freezer for an hour or two. It does tend to freeze solid if frozen for longer.

Variations

For a Mango and Persimmon Sorbet, peel and roughly dice 1 mango then freeze the flesh.
Add the frozen mango with the frozen persimmon, and omit the orange juice. Blend in food processor.

For a Pineapple and Persimmon Sorbet, peel and roughly chop about 100g of fresh pineapple, then freeze. Add the frozen pineapple to the frozen persimmon. Blend in food processor.

For a passion fruit and persimmon sorbet, add 1 passion fruit to the frozen persimmon. No need to freeze the passion fruit. Blend in food processor.